Hiển thị các bài đăng có nhãn doll clothes pattern. Hiển thị tất cả bài đăng

Chủ Nhật, 24 tháng 2, 2019

Basic Instincts


The problem with fashion right now is that there is too much junk on the catwalk. Much of it is over designed with little thought to render the woman (or man) beautiful. Perhaps this is reflective of our turbulent times. Some experts feel the passing of Karl Lagerfeld marks "the death of fashion." Instead of looking at this in such a negative light, perhaps we can see this as the need to return back to square one  when fashion was more simple. Perhaps it's time to return to the basics.

By cutting away all superfluous detailing, eliminating bold colors, busy prints and elaborate embellishments, we are left with pure design....where shape, form and line are the only things that matter. In putting together this post, I forced myself to stick to black or white to show off the design. I stayed clear of prints, bling and the over use of accessories. I wanted create clothes without darts, or closures that would, consequently be as easy to construct as they are for the dolls to wear. For that you will need a thin jersey knit fabric.

If you haven't already made jersey knit (dartless) slopers for your doll, please visit the post, "Dolly Patrick Kelly" which has embedded video instructions. Once you have that, we need to modify it to suit our designs. It is as easy as redrawing the neckline! I will recommend, however, that you put the pattern  on the doll to see exactly where you want that neckline to fall. For this project, I will be using a strapless dress pattern and a one-shouldered option that ends in a point.

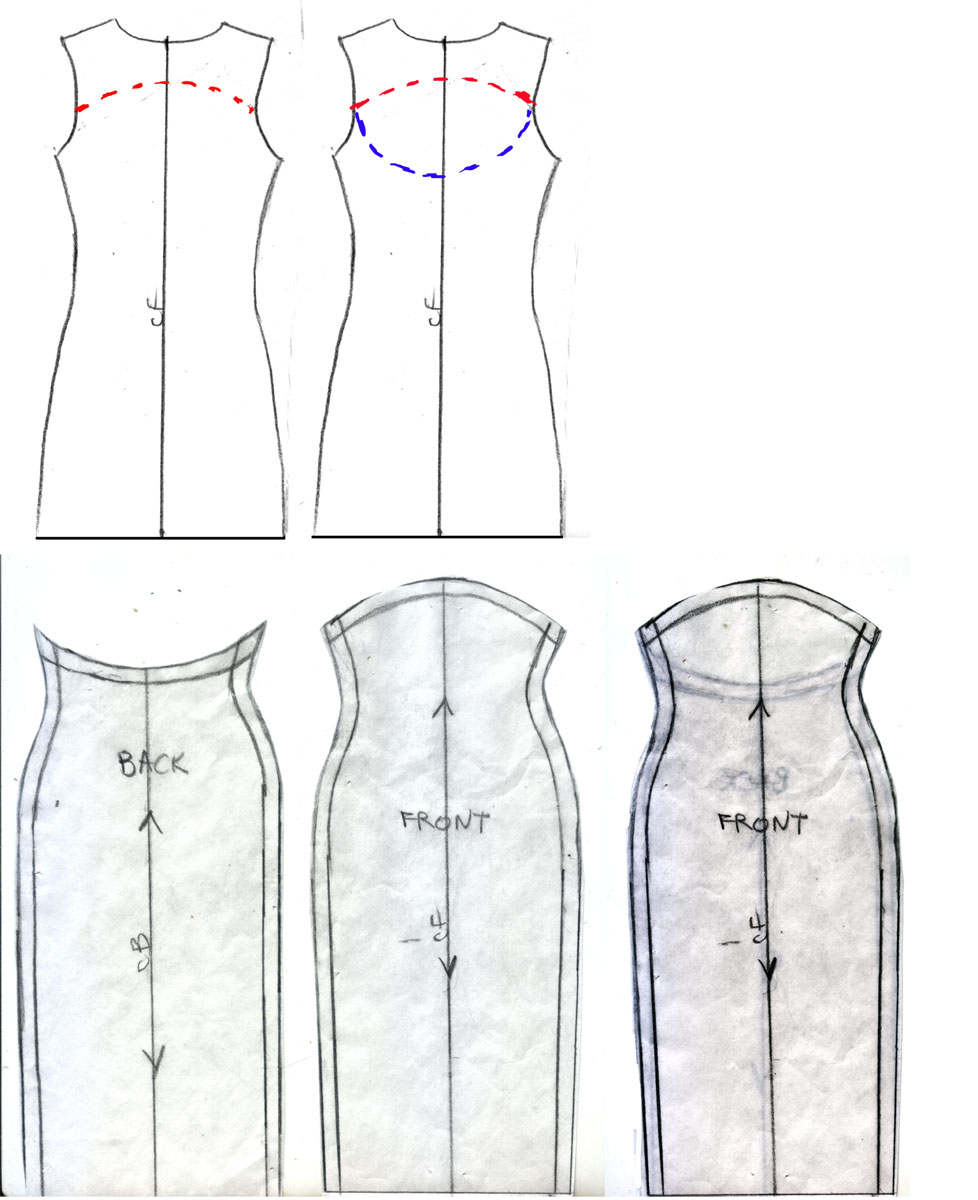
After you have drawn in the neckline of the front (red dotted lines), you will need to decide what you want the back to look like and draw that neckline in as well (blue dotted line). Finish your pattern by adding your seam allowance (bottom). You want to be sure the front and back will meet as they should on the side seams. Place the pattern together and make any corrections needed. So, for example, my strapless swerves around the top of the bustline in the front and scoops down in the back. Take care that the lines move gracefully from front to back.


Depending on the style, you can repeat the front neckline onto the back or they can be different so long as they move from front to back at the sides in a continuous line. For my first dress, I am using the one shouldered front with back that has a scooped out neckline.
One Armed Bandit
My journey began with a photo of a dress I found on Pinterest (designed by Marcellomoda, but I found the sleek, simple lines were so very modern, absolutely fabulous.

For this dress I used a combination of flat pattern drafting and a little bit of "draping." It begins with the knit sloper I modified into a one-shoulder design.

The back drops into a scooped, rounded out neckline. Instead of working in my final fabric (a 2-way stretch rayon jersey), I cut up an old T-shirt, cut out the pattern, then sewed up the sides with a long running stitch. This is what we call a "toile" (or muslin, in English).
1. To make the sleeve, I cut a rectangle of fabric, the length and a half of the doll's arm.
2. Pin this under the arm. (If you are making this for Barbie, you will have to allow a bit of space so that her spread finger hand can get through the sleeve.
3. Wrap the rest of the fabric around the neck and pin to the peak of the dress on the other side.


4. Mark the transition from the top of the sleeve, around the back to point where this extension meets the dress in the front.
5. Cut away the excess )leaving a small margin for the seam allowance.
6. Mark where the pins join the sleeve together on both sides.
 7. Remove the toile from the doll. Remove the stitches and lay flat. Put a piece of tissue paper over and now trace the dotted lines to create your pattern. Even if the lines are slightly jagged or have weird bumps, this is the time when you want to smooth out those lines so that visually they are more graceful and balanced.
 
My pattern looks like this. Just to be sure everything is what it should be, I use this pattern to make another toile out of my T-shirt fabric. If the part that went around the neck was too thin, tape scraps of fabric to the toile to get exactly the look you want. Verify the front and back meet as they should, particularly on the sides where they meet.

You will then need to remove the stitches, lay it out flat and create a new pattern. When you are happy with the fit, it's time to make this in fabric.
 Even though this makes a great short dress, I thought it would be more dramatic in an evening length. Here, I've pinned on a length of fabric to see how the design looks as gown and see how much I need to lengthen my original pattern. By the way, the curved edges are finished by sewing on a narrow strip of bias tulle (or a similar product) then turning the edge inward. I used very tiny slip stitches to hold it in place. The straight edges can simply be turned under and stitched. Because the fabric stretches in two directions, the doll can slip into any of these looks without the need for closures of any kind.
 Gorgeous from every angle!!!

I love this dress so much, I tried to make something similar along the same lines. This time it's a bit more simple. The next dress borrows the idea of one sleeve but remains separate from a simple strapless column dress.
 Make the strapless dress. There are no modifications to the basic pattern. All I've done here is repurpose the sleeve from the first dress into a partial stole.
1. Again, I take a long narrow rectangle of fabric, roughly 12" long (or more, if you like) by about 3" wide. On one end, pin to fit the doll's arm right up to her armpit.
2. Take the rest of the fabric and drape over the front of the neck.
3. Toss over the shoulder. Adjust length if desired.
4. Cut away the excess around the sleeve part of this element. Mark where the sleeve begins. When you draw your pattern, angle your lines outwards so that the opposite end (the stole part) is much wider than the sleeve part. For my pattern, it is 1" (including seam allowance on the sleeve end and 3" on the stole end.

What is interesting about this, is that you can make several of these in different fabrics or colors to coordinate or contrast the original garment.

Don't Shrug It Off
The next dress is even simpler. Again I begin with the strapless column dress, this time in evening length cut from stretch velvet. I've added a "shrug." This is a tiny garment just big enough to cover the arms and a little bit of the shoulders. It's made in one piece from a narrow rectangle of fabric.
The width of the fabric is as wide as the doll with outstretched arms. For Dorian, that meant a 10" wide, 1-1/2" long piece of stretch velvet (again, feel free to use contrasting fabric).
Just in case you're getting a little bored with these basic dresses..there are all kinds of things you can do with a simple silhouette. Add embellishments.
It's as easy as that!
 For Katoucha, I had a moth eaten scrap of cashmere around the house. I made the same dress and shrug then added tiny pearls where the moths had left holes! Don't forget...the fancier the fabric, the more simple the garment should be.

Well....I could have ended this post right here. But you know me....once I get an idea, I tend to run with it. Besides, who knows when I'll be this inspired again.....

I saw a gorgeous red backless dress designed by French designer, Josephus Thimister.

What I loved about it was the deep neckline in the back framed with a single drape of fabric.
1. I decided again to make a toile to be sure this dress would work. I began with the basic knit sloper that I elongated into an evening length dress. 
2. I put it together enough to get on the doll. I did nothing to the front. 
3. For the back, I drew a deep U-neck. 
4. Then I cut the back neckline out. I added string (to simulate spaghetti straps) to the top and middle of the neckline.
5. Cut a square, roughly 5.5x5.5" (14x14 cm) and fold in half to form a triangle.
6. Attach the tip of the triangle at the shoulder so that the long side of the triangle falls straight down with the apex pointing away from the body.
7. Take the apex point of the triangle and pin near the center of the dress (near her buttocks).
8. Take the lower point of the triangle and pin on the hip.

I was very happy with the results of the toile, so now it's time to do this is my definitive fabric.
9. I decided to only put the straps near the waist (and not at the shoulders). If you are tempted not to put straps in at all, just know that the neckline is so deep, the dress will tend to buckle around the midsection. The straps help keep the dress close to the body.
10. You can use ribbon if you like. But if you want the look of spaghetti straps, embroidery yarn is just the thing. Thread it through a needle with very wide eye. Be sure to knot at one end. Make a couple stitches in place and knot again. But leave enough length to tie. Repeat on the other side of the neckline.
11-12. Cut your square. Fold diagonally in half. Stitch then press well.
13. Again, tack one point of the scarf so that the longest side hangs down the center back of the doll.
14. Take the apex of the triangle and tack on the hips near the buttocks.
15. Take the remaining point and tack on the hips. Pin this in place first before you commit. You may have to make a few adjustments depending on the weight of the fabric. When you have finished you want the triangle to drape so that it covers where you have tacked the bottom point near the buttocks.
16. I like to also tack part of the triangle to the side of the dress just underneath the arm.
Again...beautiful from all angles.

And so, you may be wondering, what ever happened Anna in that red dress for Valentine's Day? Here she is. We're breaking a rule here, by using a loud color. 
 It's basically the same dress as the white dress featured above.....except....

Instead of taking the bottom point off to the side on one hip...we tacked it on the other shoulder. In other words, this is almost like a triangular scarf suspended from both shoulders. Here, I've used a narrow ribbon dotted with a rhinestone heart for the strap.

Okay, this is the last one before I let you put your scissors away. I loved these back neckline drapes. This made me wonder if it were possible to do a successful cowl neck dress for a doll. The answer is....YES! I found the simplest draft for a cowl neckline. Not sure how it works for full scale humans, but for the doll, it is quick, easy, perfect!  Again, I am using a 2-way stretch fabric.
1. It begins with the basic knit jersey sloper. You will need to decide the depth of the neckline you want to create. Redraw the neckline (red dotted line).
2. From the center back moving towards the side, cut along the red dotted line which is about 1/2"  (1cm) down from the armhole. Cut but do not completely sever.
3. Spread open this top part of the sloper, bending back as much as you would like to introduce the drape. The more you bend, the deeper the drape. Here, the widest points between the two points of the top and bottom elements measure 1-1/4" (35mm). Next, draw a horizontal line from the top most point of the top element. It should be perpendicular to the center back line.
4. Trace around this new shape to create your pattern. Trace over to the other side of the center back line and add seam allowance (in blue). You now have your back dress pattern.
5. Draw the neckline you want onto the front sloper. Don't make this too deep or the dress will not be able to stay on the doll without straps.
6. Trace over to the other side of the center front to create a one piece front pattern.
7. Add seam allowance (blue) to finish the pattern.
Sew front to back. This is what the dress looks like off the doll. Flat on the table, it looks rather bizarre!

Once on, the dress comes to life. The back will pertrude away from the body. Bend the bottom of the neckline inwards and adjust the folds.

Very pretty silhouette!

My goodness....we haven't even touched little black (daytime) dresses...(wink, wink).


Follow us on Twitter: @FashDollStylist
Like us on Facebook: @FashDollStylist
We're also on Pinterest: @FashDollStylist

And of course, we are on Instagram: @fashiondollstylist


Except for the two  small designer pix, all photos and text are property of Fashion Doll Stylist. 2019. Please ask permission before reposting and please, please please always credit us. 

Thứ Tư, 6 tháng 2, 2019

Dolls on the Orient Express


Inspiration for this project came from old world countries served by the famous train--The Oriental Express. This resulted in a multi-tiered look based on a very simple dress built around or incorporated with a piece of statement jewelry. It is a look I'm calling.....The Necklace Dress!
These are basic dresses (straight, gathered or flared) with a fanciful trim that can be worn as is or to frame elaborate statement jewelry. While my journey began with a version of Russian designer, Valentin Yudashkin's caftan I was also drawn to regional costume originating from different parts of Africa. I will warn you in advance....this post is multi-faceted and I hold you had every step of the way right down to the hand rolled hem of the last dress!
In an effort to find simple solutions for the 1/6 version of Yudashkin's dress, I used a vintage earring to make the necklace. But since I was creating an entire project around the "necklace dress," I decided to make my own jewelry....which was the starting point for two of the three dresses on this page. 
I cannot tell you where to buy the exact items. Matieres Premieres, my favorite bead shop is in Paris. But I simply wanted to share with you how easy it is to construct the jewelry. Each element was separate but joined together with a tiny link. I put a link parallel to where the links in the jewelry exist so that you can see where they are joined. Be as creative as you want to be. The look is a bit excessive but then again, that is what "statement" necklaces and chandelier earrings are all about! 

 You don't want a dress that overpowers the jewelry, or one where all of the "extra" work is hidden. So, for the first dress, inspired by the caftan--I began with a simple, evening length tent dress. I used a stretch material...a 2-way stretch rayon lightweight jersey. This kind of fabric drapes beautifully over the doll's body without bulk!


The top left image shows a draft of the tent dress. You can find the detailed explanation by going HERE. The only modification to the original pattern I made was to shorten the shoulder line so we see more of the doll's arms. I made a mark 1/2" (1 cm) away from the neck point on the shoulder line, then drew a new armhole as shown by the red dotted line. I also made a mark 2" (5cm) down from the neck on the center front line. That is where I slashed the front of the dress.
Assemble the dress as normal. (Join the front to the back, then use a fine tulle or a product like "Dritz Seams Great" to turn and finish the armholes.) With your scissors, carefully cut a slit down the center front to the mark you made.
Time to get your trimming ready. If you use ready-made trim, skip these steps and go to step 3 after the photo below. Otherwise, you can make your own as I did. I chose to make my own trim to control the scale. But since I'm working on stretch material and my embroidery skills are not that advanced, I decided to treat this step like my "Faux Embroidery" post. Instead of using lace insets, I've created my own! 
1. I found a small hoop at my crafts store. The hoop keeps the stitches from shrinking the fabric while you stitch. You can use a fine tulle as a base for your embroidery. Here I've used a synthetic organza I had on hand and stretched it within the hoops. 
2. Take a small piece of paper and tape it to the doll. Draw a SIMPLE design like leaves, for example.
3. Once you finish, pin the drawing to the underside of the fabric,
4. Using a dressmaker's or pastel pencil to transfer the drawing.
5. Thread the needle, (double thread) knot at the end. Begin on the underside. This is a simple satin stitch. You move from side to side of the drawing with what resembles a whip stitch until you arrive at the end. Push the needle through to the backside of the fabric, knot and clip the thread. I was not entirely happy with the result enough to leave it as is. Metallic thread does not lay down the same way as silk or nylon thread. But that did not stop me. I added silver beads to the design and was very happy with the result.! Repeat this for as much trim as you will need for the project.


On the upper left hand corner you see the result of my trim. 
1. I cut the design out, leaving ample space around the design. 
2. Then very carefully, I flame sealed the edges to within 1/16" of an inch (2mm) of the design. The technique for doing this is found HERE.
3. After you have slashed the center front of the dress, you must finish that edge. Because I have used a jersey, instead of doing a facing, I decided to finish the edges using the fine tulle tape (or 1/2" strip of tulle). After slashing, open the front up and carefully pin in the seam tape without stretching. Sew, then turn under and press well. Add seam tape to the rest of the rest of the neckline. Sew and press. I made tiny stitches around the entire neckline to hold the tape in place. 
4. Now add your trim.  If you underestimated the length of the embroidery you made, you can add more beads directly to the neckline of the dress.

The problem with such a deep neckline on the doll is that it tends to open up too widely. If you have this problem, you can carefully add small stitches to attach the dress to the necklace near the neck.

Instead of sleeves, I chose to make those small, fingerless gloves which, I feel, maintains the sleekness of an already super charged look.
Make a tube and wrap around the doll's arm as shown. Pin then mark where the pins were so you can create your pattern.
Cut both the top and the bottom at an angle.
Now flatten and make your pattern, adding seam allowance.
If your trim is fairly flat or if you have embroidered directly onto the sleeve, hem then sew up the side seams and turn the finished sleeve right side out. But if your trim has beads and your tube is fairly narrow, sew everything up, turn right side out. Then put the tube on the dolls arm and carefully stitch to the trim.
Even though I started out with such a simple dress, the results are majestic especially after the jewelry set is in place!


Though rooted in tribal Africa, this next dress with its beaded collar hints at the early 1960's. My mother had a dress with an embellished collar which she saw as built in necklace! When I began this dress, I was really trying to recreate a simple pattern I learned in my first semester of college. What I discovered is there are styles incompatible with the tiny proportion of a 12 inch doll! But you know me....I did not stop until I found a solution. The problem is...this is a whole lot of work for a very simple dress. I will show you anyway for you to see how the dress should be made and then an easy way to get the same look.

Drafting the pattern couldn't be easier. The front and back slopers are put shoulder to shoulder. Mark the width of the collar and draw in from the center front to center back. Keep in mind nothing under 1/2" (2cm) will work. Make a mark to also designate the shoulder line and center front. Then place a mark in between the CF and the shoulder so you know where to place the finished dress bodice. Draw the pattern then transfer to the other side of the center front to create a full pattern. 

1. After cutting away the collar draft, there is the rest of the dress bodice. 
2. Mark the midpoint of the neckline on the front sloper and again on the back sloper as shown in the diagram at the top.
3. What is left of the sloper at this point, mark the midpoint at the top and draw a line to the apex of the dart. Do this for both the front and back pattern. This is to add fullness to the center of the dress. 
4. Draw a line straight down from the underarm to the waist. Repeat for the back.
5. You will end up with something that should resemble this. Extend the side seams on the sides to create an evening length version of this draft. Be sure to compare the front to the back sides to make sure your front and back patterns are the same length.
Add seam allowance.
1. Begin by assembling your dress. Sew the side seams together.
2. Finish the armholes with fine tulle tape.
3. Turn the tape inwards, press and make tiny stitches to hold in place.
Make the collar. Cut two from your pattern. One will be the top layer which you will add interfacing, the other serves as the lining. Cut another out of iron-on interfacing. Remove the seam allowance first then iron on in place on the underside of the collar. 
4. On the front of the dress, make two rows of running stitches. Place your stitches above and below the stitching line.
5. Line the front up against the bottom of the collar at the center front then adjust the gathers so they fall in between the marks you made on either side of the CF.
6. Pin in place then stitch. Do this for the back of the dress, placing them near the center back of the collar.
7. What you will notice after stitching in the collar is the line of gathering  in view. This can be removed now.
8. Fold the seam allowance inwards on the collar interfacing as well as its facing.
9. Slip stitch in place
10. Eventually you will turn the ends inwards and sew together as well. But, let's admit it. This is a whole LOT of work for something too simple and, given the difficult, the result is likely not to be all that pleasing. So.....there is an alternative. But before we get to that....let's save this dress.
Sequins or beads...you decided. Thinking of my mom's dress, and thinking I would use gold jewelry, I first chose tiny sequins. But when I finished I was still not sold. The fabric of the dress is a striated chiffon which is very soft. I ended up ripping away the sequins and replacing them with tiny pearls. This is exactly what I wanted. A dress that does not need a necklace! But we're not finished yet. Remember those sleeves from the Yudashkin dress? I thought the simplicity of the silhouette and the softness of the dress would be perfect for the addition of sleeves.

I took my pattern for the bell sleeve and modified it by lowing the cap by 1/2" (1cm). You could simply cut off the top, but I wanted a gentle curve at the top.


11. Begin by turning down and hemming the top and bottom edges.
12. Double row of shirring. If you this by machine, put elastic thread in the bobbin. When finished draw the regular thread up a bit so that the sleeve cuff will fit the doll's wrist. 
13. Sew the side seams of the sleeve.
14. Turn the sleeve right side out.
15. Pin the sleeve to the lower third of the dress arm cap.
16. Put each edge together side by side and use tiny stitches to attach.
17. The finished dress will look like this.

Okay, remember how I said we could do this easier? The next dress has the answer. Instead of all the delicate manipulations to make a perfectly circular yoke, use a non woven material--in this case, leather! And since I made the choice to add a third dress to this project, I decided to flare out the sides of my original pattern into a tent dress! I cut this dress out of a super sized abstract printed silk twill which marries well with my "oriental" jewelry. The pattern of this dress is inspired by those ancient African gowns suspended from colorful beaded collars.This is a good example of how to take folklorique costume and transform it into a thoroughly modern look!

I made a second jewelry set, this time in gold.
Again, this is simply an assembly of tiny elements held together with links. The wire around her neck can be cut to fit the neckline perfectly.
The pattern is the same as the white dress except the sides were flared out. The collar is the same except I will ignore the seam allowance. Again, you can make your collar more or less wide.
The collar is the same, except I only cut out two: one for the collar the other as a sort of lining. Assembly is exactly the same.
1. For the collar, I used leather. If you want to embroider your collar, you can use a non woven material that is easy to sew like felt, for example. Since I don't want the construction of the dress visible from the underside of the collar, I cut a second collar out of lining material. Be sure to finish the edges with some sort of fixative to keep the lining from fraying.
2. Gather the front of the dress as shown in the prior dress, then fit it within the markings you made in the front of your pattern. 
3. If you are using leather as I am, tape this to the collar. Otherwise you can pin this in place.
4. Using tiny stitches, carefully sew the dress to the edge of the collar.
5. You want to keep them tiny so they discreet. Repeat this for the back of the dress.
6. Here, I used fabric glue to attach the lining of the collar. If you are using a material like felt, you can carefully machine stitch the lining to the collar. I closed the collar at the back of the dress using a tiny square of Velcro.

One more thing before we're (finally) finished..... a quick demonstration on how to roll a hemline.
1. Begin by machine stitching along the edge of your garment.
2. Use the stitch to help you roll the fabric up, then over.
3. You can use a pin to keep the hem in place as you go along. Thread your needle. You will use a single strand.
4. Slide the needle underneath the roll (but not through to the right side of the fabric) and pick up a single strand of the fabric. Next, slide the needle through underneath the roll again then up and through the hem. 
5. Continue until you have finished. The stitches should be as discreet as possible on either side of the garment.
6. On the right side you hardly notice. In the 1960's dressmakers would leave hem as a "soft roll." I prefer to press my hem. Just be sure to press down on the hem, section by section as opposed to scrubbing from side to side which could stretch it out.